
Measure twice, cut once. Every good contractor knows the truth there.
Vinyl fencing is no exception. Fortunately, if you set yourself and your team up for success, vinyl fencing should come together in a snap.
When we thought about creating the contractor’s install checklist, then, we didn’t feel like you needed an assembly guide. Instead, we want to help you do the prep work properly. This way, your vinyl fencing project should come together with ease.
#1: Get the intel you need
The information gathering you do on the front end can make or break your project. Talk extensively with the owner about their vision and their aesthetic preferences. Ask them how they want to handle any shared boundaries, including fencelines. If you’ll be working close to the property’s edge, it often helps to look over the survey, too.
Pay attention to trees, tree roots, slopes, dips in the terrain, including if the ground is rocky or sandy. But also look for potential heat sources, like grills, tiki torches, reflective metal objects, including Low-E windows that could damage your customer’s investment.
As you plan for the project, account for utilities. You are required by law to request that any underground utilities get marked. Make sure you flag any irrigation, like sprinkler systems, that aren’t owned by utility companies. This helps you plan your fence post placing intelligently.
Lastly, be sure that you have information on the access to and from your work. How close can you park your truck to the work? Will there be hand-carry? Are there hills to climb with material? These will all factor in to how a contractor should estimate for their costumers.
Measure carefully
If you measure properly, vinyl fencing comes together easily. If you don’t, your project hits roadblocks.
Start by measuring the total linear footage and the length of each fence run. Make sure all of your corners are truly square. Now, measure again.
Then, do the math. You need to figure out many fence panels, posts, and gates you need. We have a guide you can use to figure out your material needs based on your measurements.
Our specialists are also available to help you. We can use our in-house CNC machines to customize the fencing to your project’s requirements.
The most experienced contractors will be able to determine how many posts, pickets, rails, screws etc. they will need for each job. This is why the most knowledgeable contractors order their jobs by material list, versus by the panel or by the foot.
Be thorough in your staging
Laying out the fence guides your installation crew. It makes sure that what you’ve planned is what actually gets executed. So take your time here.
We find that contractors get the best results when they use string lines to map out the fence run, then use paint or stakes to precisely mark the spot for each fence post. Again, double-check for square corners.
With the planned fencing clearly marked, loop in the property owner. Walking the fence line with them helps you make any adjustments when they’re still easy.
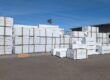
Once the fence is staged, get your materials ready, too. Our material guide can help you make sure you have everything you need on hand.
Move methodically through install
With everything mapped out and all the necessary materials on hand, your team should be able to move steadily through installation. Make sure they check for levelness, plumbness, and corner squareness at each step along the way. A customer knows when someone takes pride in their workmanship.
Once the posts are set, the rest of the installation typically flies by. That’s particularly true when you’ve done all the prep work to set the project up for success.
We can help. To talk with vinyl fencing experts about your project’s specific needs, contact our Vinyl Craft team today.